Monday, January 27, 2014

Mani Monday - A Little Leopard

A typical Sunday for me includes grading last week's assignments, lesson planning for the coming week, making the week's lunches, and cleaning the house. It's a blast.

Then, once all that is done, I settle in to watch Girls on HBO and paint my nails. 

Sometimes I do something boring and basic, other times I create a fun design. Either way, I usually get complements from my friends, coworkers, and students...so I thought I would share my weekly masterpieces.

A Little Leopard

I went shopping a few weekends ago, and stopped by Nordstrom to look for a pretty, peachy Julep polish I had pinned on Pinterest. Couldn't find it. But what I did find was these fun leopard print nail wraps.
They didn't have a preview of the leopard...this is snakeprint...also cute.

I've never tried Nail Wraps. I always assumed they would be a huge hassle and peel off after a day or so. I was wrong! The first time I tried them, they stayed on for over a week!

I'm not someone who would put these on all of my fingers at one. Using them for an accent nail, you can really make them last and the $9.95 price tag a great deal!

I paired these leopard nail wraps with my OPI Midnight in Moscow. It's a great dark red/brown color. Gorgeous. I think it would also look great with Essie Bordeaux.

I used my Sephora Formula X System on the regular polish, and just brushed some topcoat on the tip of my accent nail to seal the wraps. I guess that worked fine. Here is the result. I like it a lot!


Do you like using nail wraps or creating nail art? If you have a blog or pinboard, I'd love to follow!

If you like, please share! If not...constructive criticism!

Thanks,

Sadie

Sunday, January 19, 2014

Manicure Mania

I love doing my nails.

When I was in middle school, I remember spending hours creating awesome nail art...polka dots, American Flags for the 4th, Christmas trees, *NSYNC theme...the list goes on. This was before the nail art trend, so my tools included toothpicks, bobby pins, and Scotch tape.

My senior year in high school, I made plans to get a manicure for my senior prom. They would be purple and sparkly to match my amazing dress. The day I was supposed to get my nails done, one of them broke. So, the nail lady convinced me to try acrylic nails. Fast forward almost ten years..and I was still getting my acrylics filled faithfully every 2-3 weeks.

This was getting ridiculous. So, this summer, I decided to start doing my nails again. Imagine my disappointment when I realized that in the 10 years I had been away from nail polish (on my fingers, at least) the quality/durability hadn't changed much.

Seriously? I just painted my nails yesterday and they're already chipped? How do you people live like this?

Thankfully, I have found something that works. Like, really works. For Christmas, my mom got me the Formula X System from Sephora. Whoa. This stuff is great.


This stuff is seriously awesome! I take my nail polish off because I'm sick of the color, not because it's starting to chip. We're talking 5-7 days, at least.

Four easy steps:

1. Use the Cleanser to get your nails ready for polish. A little goes a long way...one dip is good for 3 nails

2. "Sticky" base coat. I think this is the key to it's success.

3. Nail color. When you buy the set, you can choose which nail color you want. Or you can pick from any number of colors in their set. Right now I'm loving this turquoise color, appropriately named "Inspiring."

     
Obviously, they tell you that you should use Formula X color with the System, but I have used OPI and Essie and they have worked perfectly fine!

4. Top coat. I apply the top coat again after 3 days or so to keep it shiny.

If you are someone who always has their nails painted, like me, and are sick of chipped polish, I really suggest you give this a try! 

If you like this post, please share it! If not, I'd love constructive criticism.

Sadie


I'm Back...I think...

It's been a while.

It's been over six months since I have posted anything. I originally had all these goals of posting regularly and getting lots of followers...and then I didn't.

I don't believe in New Year's Resolutions...I just believe in goal-setting. So, my goal is to attempt to post every two weeks or so. Not about anything specific.

I don't like that blogs have to fit into a certain category. "Teaching." "Beauty." "DIY." If I wanted to write about all the things that matter to me, I would need 4-5 different blogs just to fit into the pre-determined categories. So, I guess this blog is going to not fit into anything. 

Sometimes I will post about teaching. I create tons of resources for myself that I think other technology teachers, or teachers who use technology (there is a difference) could really benefit from.

Sometimes I will post about beauty. Not because I'm a beauty expert. At all. Not even close. More because I'm constantly trying things that people "swear by" that SO do not work for me. So I think it's important to share when something does work.

Sometimes I will post about other random stuff. Maybe I went home to the country and went off-roading. Maybe I had a great time at a Blues game. Maybe I'm bored. Maybe I think writing is a form of therapy.

So, with all of that being said, I'm going to start posting more often. For whatever reason.


Something I strongly believe, and try to live by.

Sadie

Wednesday, June 26, 2013

DIY Ikea Art

I Love Ikea. Friends from Chicago roll their eyes when I say that. So what...I'm touristy, and I love Ikea.

Maybe I love Ikea because it's something different and special. The nearest store is 5 hours away, so it's not often I get to shop the 3 levels of awesomeness. Maybe I love Ikea because when the bf is at hockey games in Chicago (more on that later), I get to wander aimlessly looking at all the wonderful home decor ideas. Maybe (definitely) I love Ikea because it is so darn affordable!

On my last trip to Chicago, I wandered around Ikea looking for inspiration and ideas for my new place. I came across a teal, brown, and black room, complete with an Audrey Hepburn picture and floor to ceiling drapes.


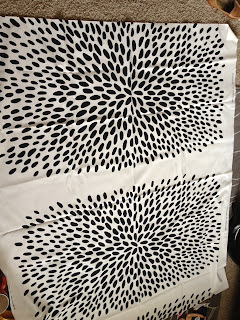
While I don't plan on doing my living room in this color scheme, I immediately fell in love with the art on the wall. Each pre-framed piece was $30, which is not too bad....I guess. But, I knew I could do it myself. One and a half yards of fabric and three frames later, I did it myself!

If you have never searched through the fabric section at Ikea, you are missing out. This particular print is called Tradklover, and it is $7.99/yd.


I kicked myself for not purchasing the frames at Ikea (for about $12 each), but I found some at Walmart for $10 a piece, with the matting.


I spread the fabric out flat and placed my frames over various parts of the print. After cutting, ironing, and framing the fabric, I spend longer than I should have struggling to hang them level and even. So many holes....

The final product above my couch turned out pretty much exactly like I hoped it would! I know it looks off-center....I was standing at a weird angle for some reason.


I'm a fan...and a bigger fan of the money I saved!


Ikea Fabric: $12.00
Walmart  Frames: $30 (for all three)
Total: $42.00 and about an hour 

When decorating, I hope you will consider using framed fabric! It really opens up your options, and looks great by itself or as part of a gallery wall!!

Please...share if you like it, or comment with constructive criticism if you don't!!


Monday, June 24, 2013

let's give this a try....

I guess I'm jumping on the Blog Bandwagon a little late in the game. I'm a Business teacher and love all things technology, so it would have made sense for me start a blog long ago. For some reason, however, I've always thought "who really wants to hear what I have to say?" That's probably still true. 

Maybe I'm starting to blog because I feel like I finally actually have something important to say. 

I'm a teacher in a suburban St. Louis school district, which I love. Some of my experiences are hilarious, and are worth sharing. A lot of my classroom decorations and ideas are totally DIY, and I think some young teachers on a budget could really use the inspiration.

I recently moved out of a tiny, old one-bedroom apartment, into a nice, two story, two bedroom, three living room (yes, three. unreal.) condo. I am spending this summer decorating this empty canvas, one room at a time. Again, I think a lot of my DIY projects are doable for anyone....because why on earth would you spend money on something if you can just do it yourself?

So, I'm still trying to figure out how to put all the fancy gadgets (widgets?) on my blog to link you to my various social media pages, as well as coming up with things to write about and ways to capture my life (I downloaded the PicStitch app just for you...).

Please...share my blog if you like it, comment with constructive criticism if you don't.